Jekyll2024-07-19T23:17:05+00:00https://miyagawa.co/blog/feed.xmlTatsuhiko Miyagawa’s BlogA blog about software engineering, podcasting, gadgets, and productivity.Tatsuhiko MiyagawaScraping Apple News+2024-07-18T00:00:00+00:002024-07-18T00:00:00+00:00https://miyagawa.co/blog/apple-newsI’ve been an Apple News+ subscriber for the past year or so, just to be able to read paywalled articles from WSJ, Business Insider, WIRED, and The Atlantic etc. It’s not my primary news source (I use Feedly via Reeder), but when I encounter links to these sites on socials or via RSS feeds, I open the link with the News.app. A keyboard shortcut for Choosy helps a lot for this.
That ended today when I learned that Apple had struck a deal with Taboola, a company known for serving low-quality ads next to web content.
Taboola + Apple News? No thanks – On my Om
The reading experience on News+ is actually pretty terrible because of the number of ads on it even before this deal with Taboola, which would make it even worse. The thing is, I don’t read them on News+. I do extract the plaintext version of the news from News+ to read it later, outside the app.
Let me explain how to automate it.
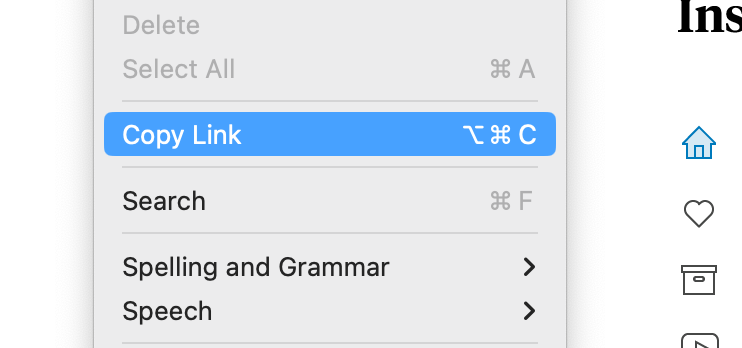
When you open an article on News app on the Mac, you can get the link for the article via a keyboard shortcut: Cmd-Alt-C:
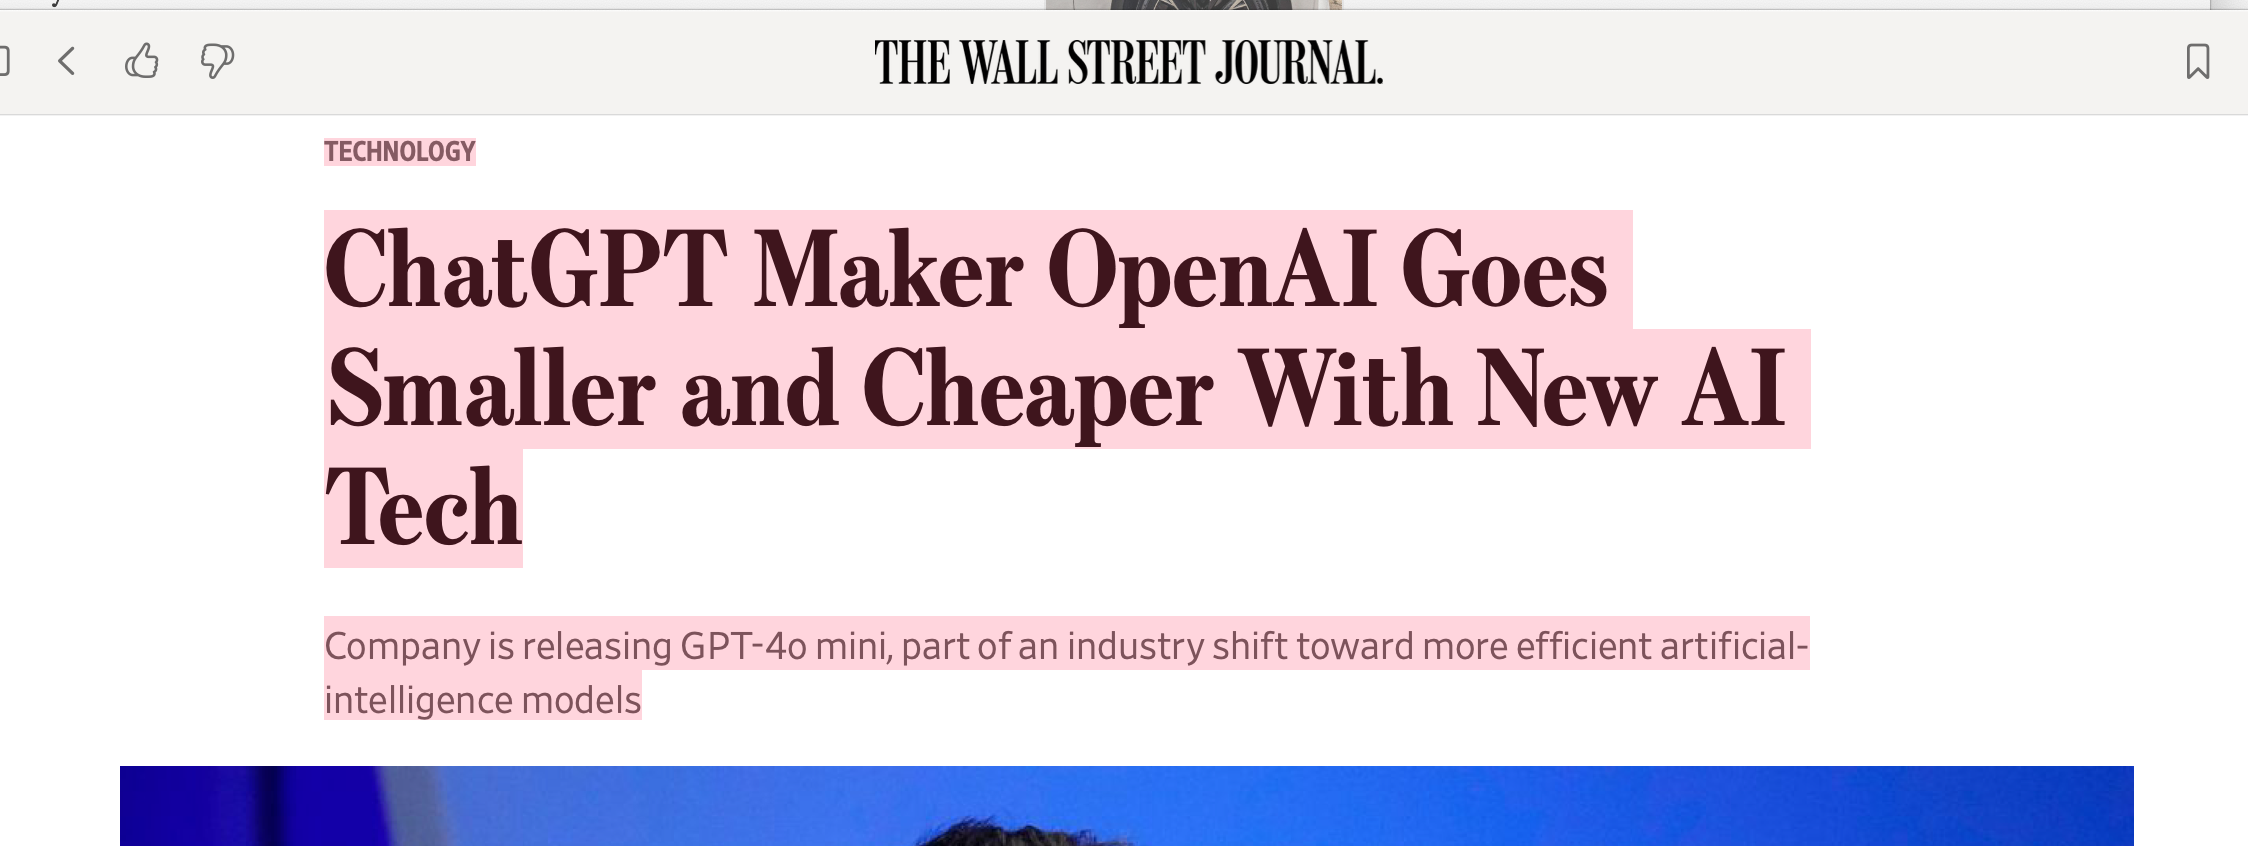
And you can extract the full body of the article by simply selecting the body with “Select All,” i.e. Cmd-A, then Cmd-C. Fortunately, this won’t include any text from the ads on the page.
The title of the article is already included in the body when you select all, but alternatively, it is available via the URL we retrieved from the Copy Link above. That URL contains a redirect page to open the News app on the Mac, but that page has a <title> tag for the article itself.
Given all that, you can write a script to run on a Mac to get:
Link (via Copy Link)
Title (via HTML of the link above)
Plaintext Content without ads (via Select All, then copy)
#!/bin/bash
# select text, then Cmd-C
# brew install cliclick
cliclick dc:.
sleep 0.2
osascript -e 'tell application "System Events" to keystroke "a" using command down'
osascript -e 'tell application "System Events" to keystroke "c" using command down'
body=$(pbpaste)

# send Cmd-alt-C to copy the URL
osascript -e 'tell application "System Events" to keystroke "c" using (command down, option down)'
url=$(pbpaste)

# get the $url to look for <title> to get the title
# brew install html-xml-utils
title=$(curl -s $url | hxselect -c title)

# do something with $body, $title and $url
The script uses cliclick to force a double click, to make sure Cmd-A can actually grab the text from the article. For some reason, Cmd-A doesn’t actually select it until you click the article page to get the focus.
I added this script to Alfred so that I can run it with a keyboard shortcut (Shift-Alt-E), and hooked it up with BetterTouchTool so that I can tap on 4-finger to invoke it on the News app.
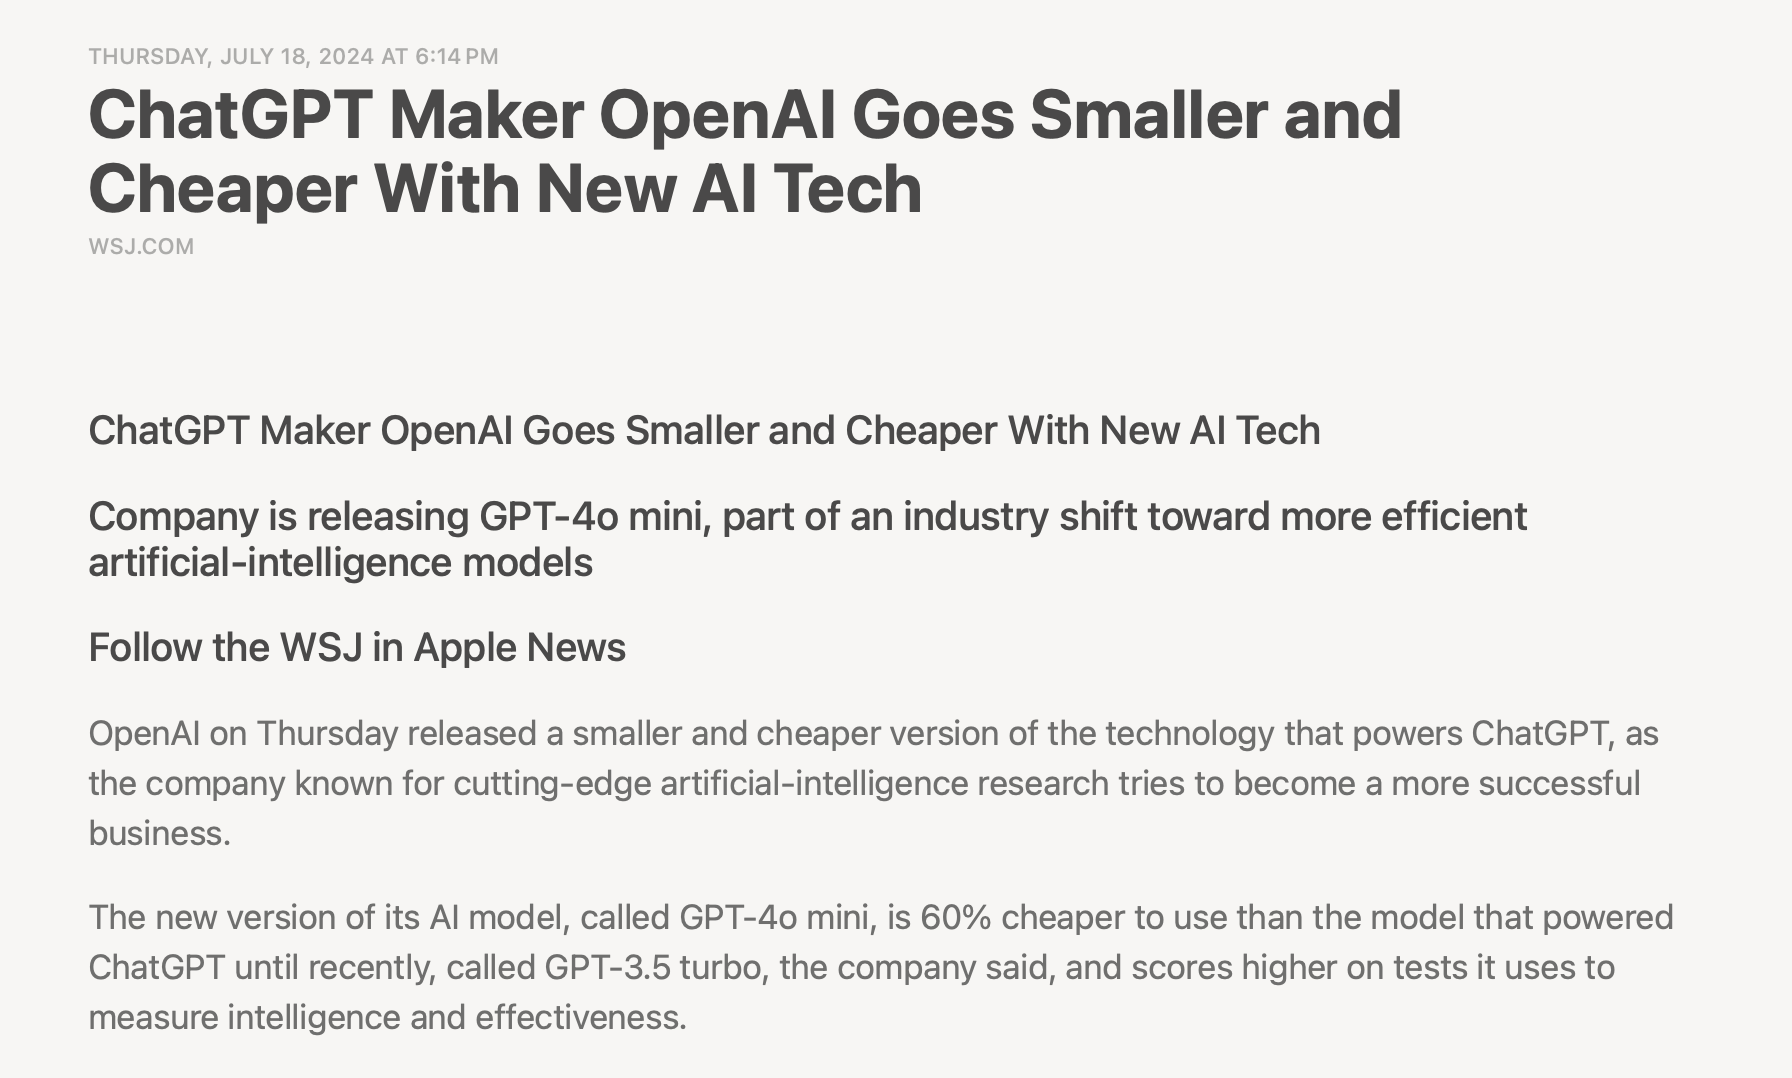
Once you get the link, title and body of an article, you can do whatever you want with it. In my case, I have another script to save it to Instapaper via API, and read them later.
]]>Tatsuhiko Miyagawamiyagawa.co2023-07-07T00:00:00+00:002023-07-07T00:00:00+00:00https://miyagawa.co/blog/miyagawa-coLast month, Medium silently decided to kill the legacy custom domains for free tier users, and broke my blog (weblog.bulknews.net) without any notice. Since this happened during my trip to Europe, I decided to sign up for their paid plan just for one month as a temporary solution. Now that I’ve returned from my trip, I successfully imported all my articles from Medium to Jekyll using the excellent tool called medium-to-jekyll importer, and now this site is hosted on GitHub Pages.
Fast forward to this week, Meta launched Threads and it uses the same username as Instagram. Because Instagram originally launched just for iPhones, and by the time it became available on Android, it was too late to secure my preferred username 1. I initially registered with bulknews, but because Instagram prominently displays the username in the timeline feed I changed it to a little more readable: miyagawa_.
At first, the existence of the underscore didn’t bother much. However, now that it’s also used in Threads and as with IG it’s always displayed in the timeline, it started to bother me. The same thing happened to my secondary Instagram account for my podcast Rebuild. I initially tried rebuildfm which I use elsewhere, but it was already taken. Luckily, Instagram allows the use of dots in the username, so I settled for rebuild.fm which somehow felt reasonable. This got me thinking: What if I could do the same for my main account, like a domain name?
For a while, I’ve wanted a new online identity that isn’t tied to a toy website that I built 25 years ago: bulknews.net. It’s often a little awkward to explain what that name means, and it’s also my primary email address and is challenging to pronounce over the phone.
So, yesterday I acquired a new domain, miyagawa.co from Gandi, and migrated the traffic to the old blog URL (https://weblog.bulknews.net/) to this new domain using redirects through Fastly. Setting up the redirects was pretty simple with a custom VCL snippet. (Disclosure: I work for Fastly)
And yes, I also changed the username on Instagram/Threads to match my new domain.
It’s not perfect, but is a good compromise. And it feels good that I have a short, memorable, and easy-to-pronounce domain that I can use for various purposes.
Interestingly, whoever had the username miyagawa apparently changed their username at some point, so the current holder is a different account. Maybe I should’ve written a scraper to periodically check the availability of the username! ↩
]]>Tatsuhiko MiyagawaPodcasting Setup 20202020-03-28T00:00:00+00:002020-03-28T00:00:00+00:00https://miyagawa.co/blog/podcasting-setup-2020It’s been a while since the last time I wrote about my podcasting setup (link in Japanese). Although I haven’t changed most of the setup since the stability is one of the most important things, I’d like to note the current setup since it might be interesting to a future podcaster.
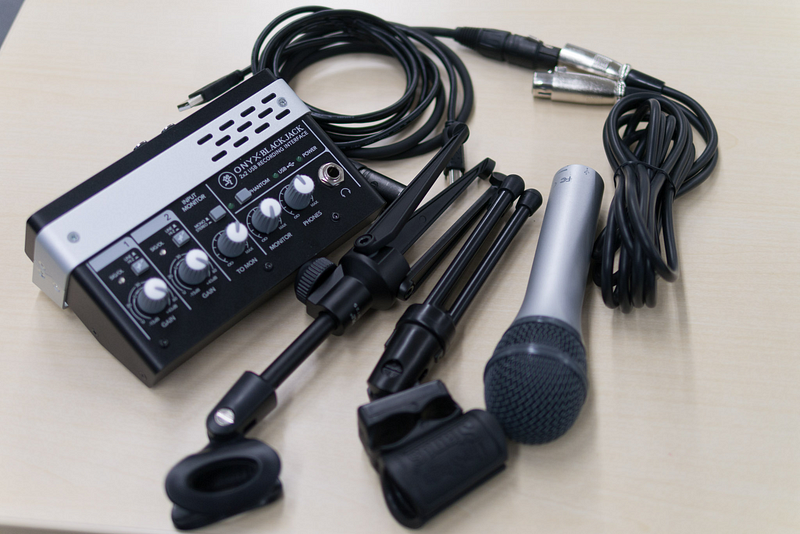
Beta87A and US2x2
Recording Environment
Before getting to the gears, it is important to pick where to record. The most ideal environment is a room with a lot of clothes (like a walk-in closet), or sound isolation pads that prevents echos. Avoid a room with concrete floor or walls, since that will create a lot of reflections and reverbs.
The room should be reasonably close to your wireless router or have a wired ethernet connection, if you intend to have a call with your guest over the internet.
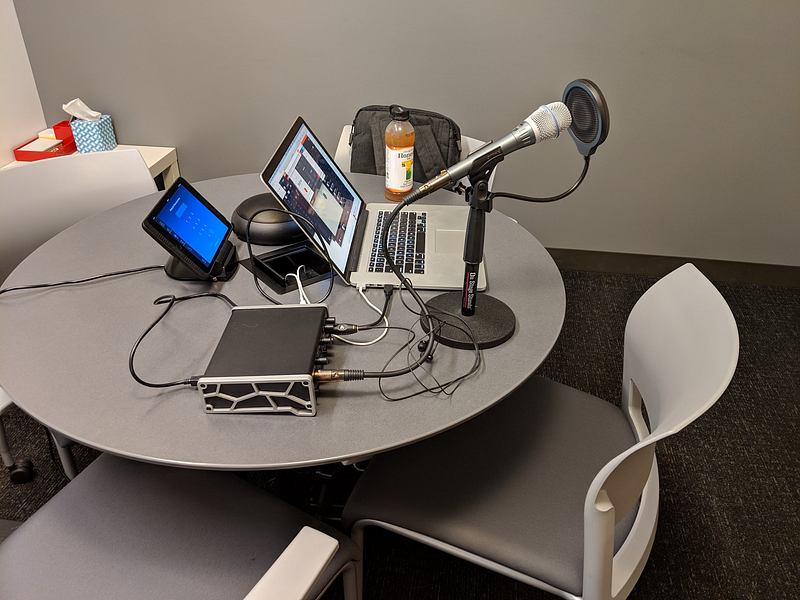
I’ve been recording at my employer’s office since it’s easy to do so during the weekends, and some of the meeting rooms have a really nice audio treatment. As of this writing however, the office is in its closure due to COVID-19 and I record from my bedroom.
Hardware
As for microphones I’ve been bouncing between multiple microphones, but always get back to Shure’s BETA series. Beta 87A (super cardioid condenser, $250) gives a pretty bright pickup pattern and I love the tonality of it, but due to it being a condenser microphone it still picks up some ambient noise and especially my mouth noise, although it’s not as bad as other condenser microphones. Beta 57A (super cardioid dynamic, $140) is a dynamic microphone and doesn’t have this problem at all. It is really a versatile microphone and has been helpful since I record from my bedroom with unexpected ambient noise from the neighbor rooms. Beta 57A’s pickup pattern sounds a bit mushy and has a harsh sibilance for my voice, but it’s not hard to fix in post with some EQ.
For the USB Audio Interface, I switched from Tascam’s US2x2 to MOTU M4 ($220), and I absolutely love it. The audio is really clean and has a lot of gain, and it comes with a hardware power switch, LCD meter, USB-C input, playback/monitor level knob, and an additional loopback channel, which is great for when streaming live.
A microphone stand (DS 7200B, $16) and/or boom arm (InnoGear, $12) is important to keep the microphone close to your mouth, 5–8 inches away. Try not to be *too *close to the microphone since that will get your voice sound too bass-y due to the proximity effect. I haven’t used any boom arm before, but as of this writing, this boom arm is very helpful to keep the mic close to my mouth when I need to record from my bedroom.
It is critical to use an in-ear monitor (MEE M6, $50), closed headphones, or earbuds since using open headphones will leak the audio and bleed it to your recordings. Make sure your guest uses an in-ear headphone with tight-fit ear tips as well.
Cheaper Alternatives
Here’s a few alternatives that are more affordable. I usually recommend them, and send them to my guests when they don’t have any microphones. Most of them need a pop filter or a windscreen.
Audio Technica ATR2100x USB ($100) — This is a USB/XLR dynamic microphone with an upgraded USB-C output. Handy for traveling, and you can even record both to computers via USB and a portable recorder via XLR.
Samson Q2U ($85)— Almost the same as ATR2100, but with an old micro USB output.
Rode NT-USB Mini ($100)— A USB condenser microphone. It is very small, yet heavy and sounds great especially when you speak closer enough to the microphone. It’s a condenser microphone and tends to pickup some ambient noise from the room though. I use this mic when making Zoom calls for my work.
Rode PodMic ($100) — I haven’t tried myself, but have seen some great reviews. This is an XLR microphone and you need a USB audio interface to connect to the computer.
Microphone Technique
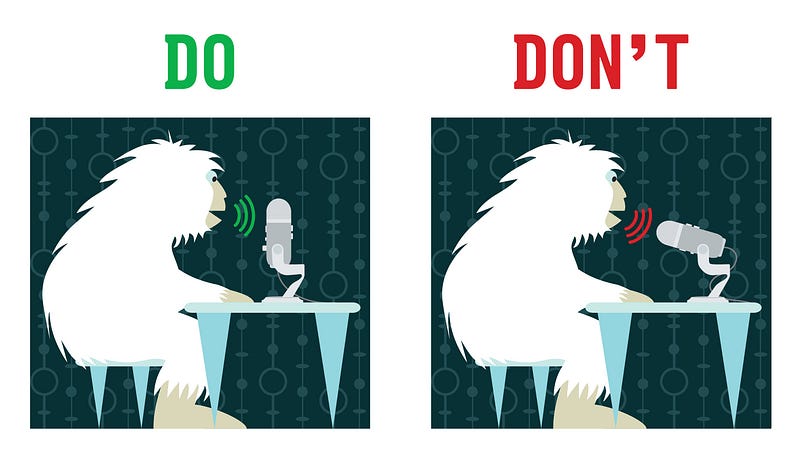
Some microphones are top-addressed and others are side-addressed. Learn which one your microphone is, and speak from the right angle.
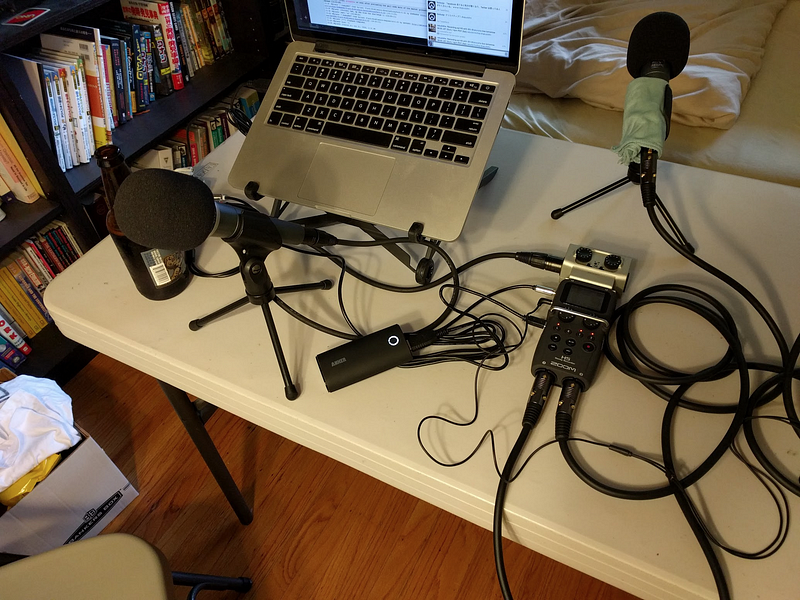
I haven’t done a lot of in-person recordings, but when I do, I use Zoom H5 ($280) paired with a few Beta 57a’s. H5 is a versatile portable audio interface, and can record it to its SD card as well. You can pair it with Behringer UCA202 ($35) to send the monitor output to the computer, since H5 doesn’t let you record the SD card and use it as a USB interface at the same time.
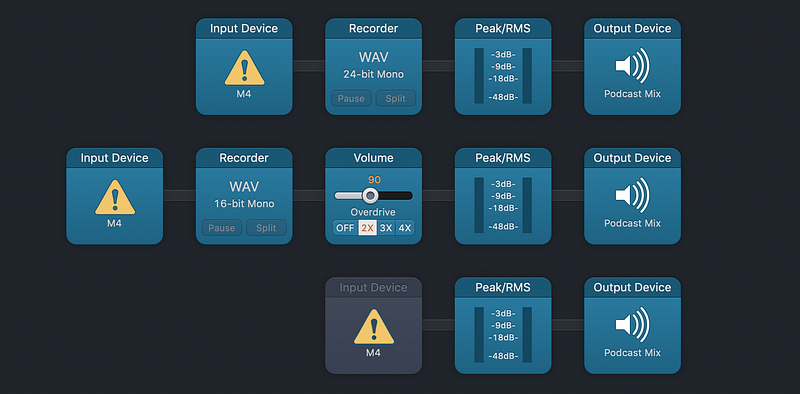
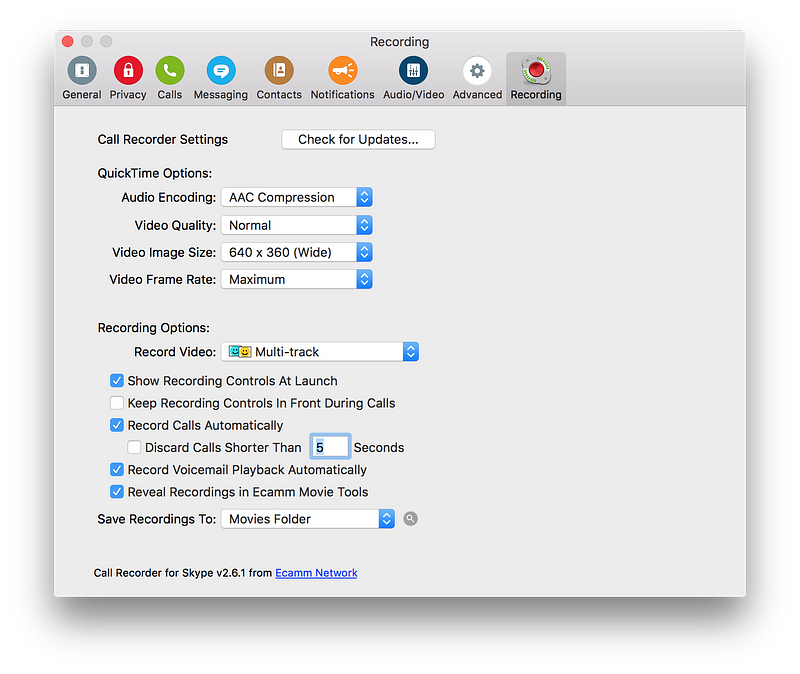
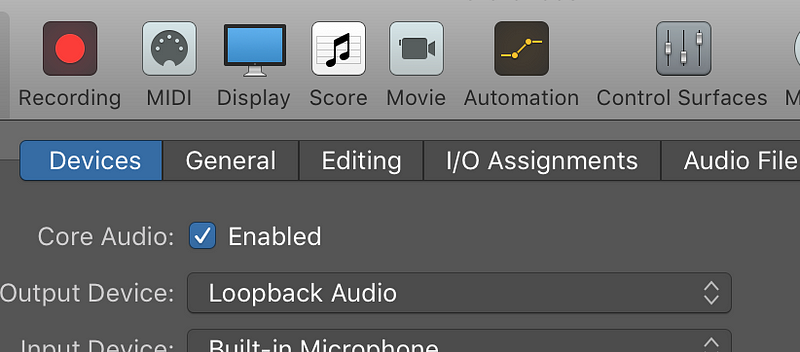
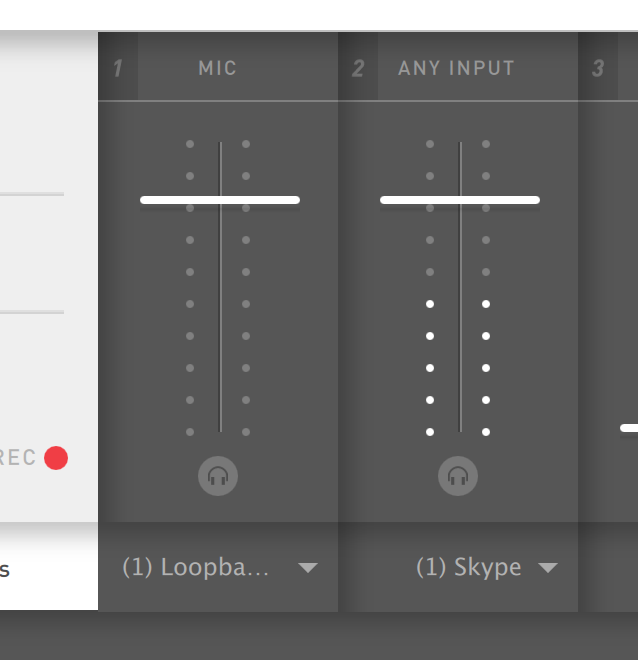
I record the show over Discord calls. Most of the time Discord has the cleanest audio with very little lags, and has reasonable amount of options to tweak when something goes wrong. Sometimes the server is overloaded, or the latency is unbearable and makes it hard to make a conversation, and we fallback to Skype, or FaceTime audio. I configure these VOIP apps to send the output to the audio interface (M4).
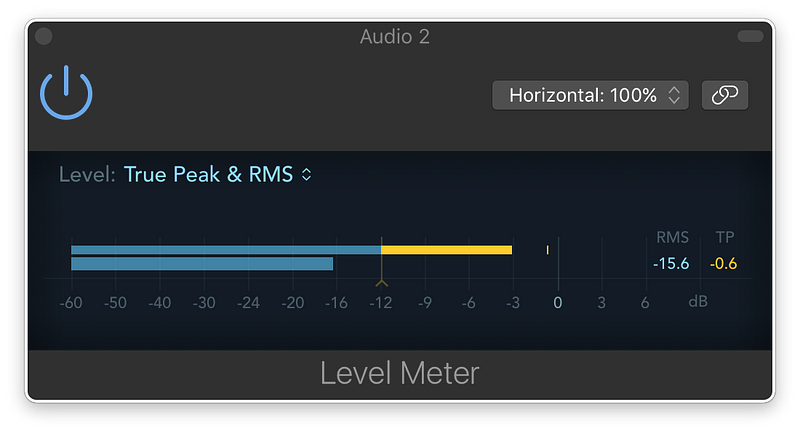
On my Mac, my voice (M4 channel 1) and Discord output (M4 loopback channel 5/6) are recorded in Audio Hijack ($59) as WAV files, and are sent to a virtual input channel “Podcast Mix” in Loopback ($99).
When I need to play some pre-recorded audio (like a sponsor read), I connect my iPad Air to M4 channel 2, and mix it in as well.
The “Podcast Mix” channel is now the input channel for the streaming software Mixlr. This way the voice of the guest and myself will be mixed and streamed over Mixlr, so I can receive realtime feedback while recording the show.
I ask the guests to record their end locally (Double-ender) using QuickTime Player, and send it to me after the show, so I can have the cleanest mix, without a compression artifact over Discord. I do record the Discord output as a backup on my side as well, in case a guest forgets to hit the record button, or records their voice using a wrong microphone (e.g. laptop built-in).
Post-Production
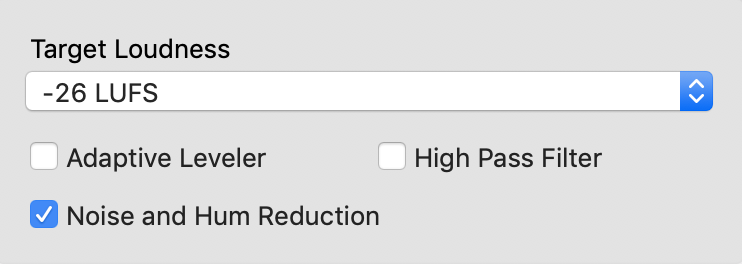
First, I run the individual source audio files through Auphonic ($89, or freemium with its cloud service) with a minimal noise reduction, and set to -26 LUFS.
I have some thoughts about this and have tried multiple configurations, but running Auphonic first ensures that basic noise and hum are removed, and that all files have the same loudness level. The output files will be imported to Logic Pro X ($199).
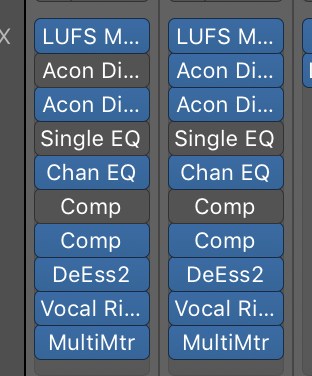
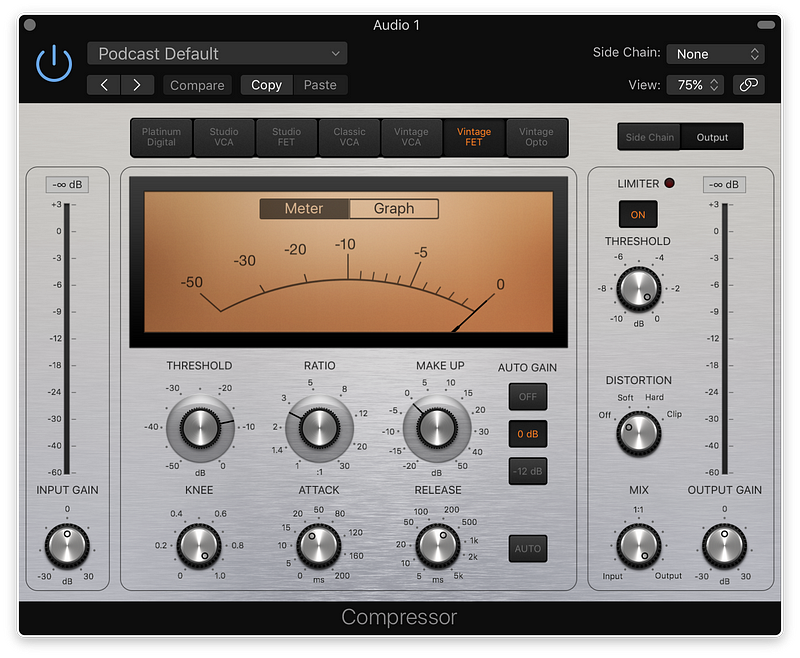
I run each channel through multiple plugins, and it’s not always the same, since badly recorded audio needs more plugins to fix it. Here’s a basic list of plugins I apply:
Acon Digital DeNoise ($99) — Usually unused. Only applied when Auphonic is unable to remove some noise such as air conditioning, or laptop fan noises.
Acon Digital DeVerberate ($99) — Only applied when the guest records in a room with a lot of echo.
Channel EQ — Cut low frequency and bump high frequency slightly to add some presence.
Compressor — Very mild compressor to reduce the dynamic range.
DeEss2 — Removes sibilance of the “S” sound.
Vocal Rider ($89) — Applied to bring up the audio level for when the speaker is quiet and brings down when they’re loud, basically to level the overall loudness over time. You can achieve the similar by applying a strong compressor, but that’d usually sound too hot and unnatural.
Adaptive Limiter — Applied to the master track to suppress all the peaks.
After bouncing the audio, I run the output through Auphonic again, with -19 LUFS loudness, without any audio filters. This is to ensure the audio level is the same across all of my episodes. I wish I don’t have to do this since in theory I should be able to do this in Logic Pro X alone — but I have hard time exporting the audio with the correct loudness level without some harsh limiter artifacts. (It’s very likely i’m not using the limiter correctly)
I encode the audio to MP3 using Forecast (free). This is just a frontend for the LAME (free) MP3 encoder. I use a custom Python script to tag chapter information to the mp3 file, reading the list from a YAML file.
During the whole post-production I use the in-ear monitor earbuds to listen to the audio. Once the audio is exported to MP3, I use the AirPods Pro to ensure the levels are roughly the same among the speakers, since different headphones have different frequency response to low-pitch vs high-pitch voices.
Cheaper Alternatives
I spend a good amount of money for the post production software for editing and encoding. This is because using these tools saves a ton of my time, by throwing some money at it. None of these is strictly necessary, and you can definitely start your show with basic software like Audacity, GarageBand or Ferrite on iPad.
Summary
This whole list might sound overwhelming and makes it scary to start a podcast, but this is the setup I’ve arrived after doing the podcast for 7 years. You absolutely don’t need all of this when to start a show, and can start with a minimum and make it grow over time whenever you feel like you need it.
Hope this is helpful to someone. Feel free to ask questions or feedback to me on Twitter.
]]>Tatsuhiko MiyagawaLinked accounts on Amazon2018-06-02T00:00:00+00:002018-06-02T00:00:00+00:00https://miyagawa.co/blog/linked-accounts-on-amazontl;dr you have two Amazon accounts linked across different marketplaces? You’re screwed.
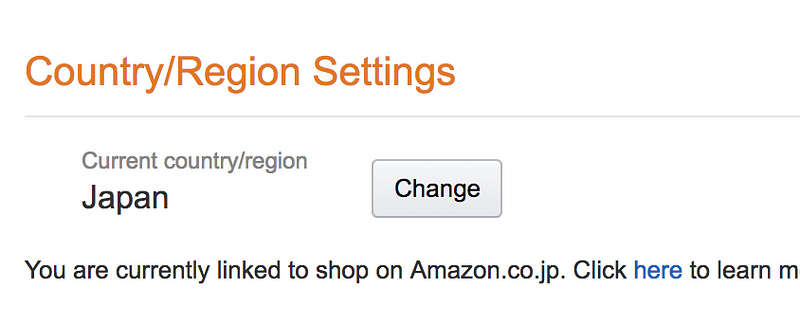
I have two Amazon accounts, one on .com and another on .co.jp using the same email address. They essentially have completely different account namespaces and there’s no problem with this.
I have my JP account since 2000 and the US account since 2007. Both of them are Amazon Prime accounts.
Around 2012–15, when Amazon.co.jp launched Kindle for Japan, they offered the feature to link these .com and .co.jp accounts. Linking them would allow both of your accounts share the bookshelf, meaning both accounts can access each other’s digital content, while being able to switch the primary store through the UI.
Initially I was skeptical, but a couple of friends who have done it told me that it’s working great. I opted in for the account linking.
This indeed has worked great. My Kindle device at the time can read books from both .com and .co.jp bookshelf, and I was able to buy new books from .co.jp using my account on the JP store.
To change the store to buy Kindle books from, all I need is to go to amazon.com/myk and change the preferred marketplace. For a long time, mine has been set to Japan, so that I can buy books from Japan for Kindle.
Now, fast forward to 2018, they have expanded the Amazon Prime and Digital Content market store to many other fields, including Amazon Music, Amazon Prime Video and Amazon Echo applications.
The problem is that the “Preferred Marketplace” setting above, which was originally set for Kindle, now affects how the default storefront should be for the other Amazon devices. And the setting is global and shared between the linked accounts.
This is what happened to me:
The Amazon Echo dot I was using suddenly stopped working with my US Amazon accounts, and the Alexa Skill I was using stopped working, because the skill is unavailable in Japan.
Amazon Fire TV stick tries to connect to Prime Video Japan, and majority of the videos cannot be streamed outside Japan anyway.
I bought a Kindle Fire tablet and setting up the account connects to the Japan storefront. There’s no way to watch Prime Video on Kindle Fire in my account.
Trying to add my family member to Amazon Household and to share the Amazon Prime benefit (Prime 2-day free shipping) doesn’t work, because apparently the preferred store setting is shared across the Amazon Household members.
Now, all of the issues above can be solved by changing the Preferred store back to Amazon.com:
This setting can be changed on the website, and I have done it in the past.
The issues I had above were gone, but of course brought other problems:
I cannot buy books from Amazon.co.jp Kindle stores anymore, and my Fire TV cannot load TV content from Japan when traveling to Japan, because now the preferred market store setting is global and is set to the US on both my .com and .co.jp accounts.
I just wish that there is a way to unlink these two accounts, so that I can get out of this mess. One account for .co.jp, and another for .com, just like it used to be. I have tried many phone calls against Amazon customer support reps, and they have been unable to help me.
Amazon has stopped offering this linking account feature sometime in 2016 (well, wise for them, because this feature brings a terrible user experience), and they do not offer a way to unlink the accounts.
The only way out I have right now seems to be that I just cancel either of these accounts, and create a new one, to get a fresh start. But of course both of my accounts are more than 10 years old, and losing the history of purchases and digital downloads pains me a lot.
]]>Tatsuhiko MiyagawaPerl Toolchain Summit 20182018-04-25T00:00:00+00:002018-04-25T00:00:00+00:00https://miyagawa.co/blog/perl-toolchain-summit-2018I attended the Perl Toolchain Summit 2018 in Oslo.
It’s a unique event with lots of perl hackers who work on perl toolchain, testing tools, core support and ecosystem such as PAUSE and MetaCPAN. They annually get together and hack on these things in the same room.
Day 0: Monday to Wednesday
I spent a few days in Stockholm as a stop over for this trip. It’s my first time visiting both Stockholm and Oslo, and they’re both beautiful, a bit cold, expensive but really nice. I also enjoyed that the contactless payment via NFC is literally *everywhere *and it was really hard to use cash that I withdrew just as a backup. Maybe more on that in another post.
Viking ship museum in Oslo
Day 1: Thursday
I stated the day off by merging a few PRs for HTTP::Tinyish from Shoichi Kaji (SKAJI). HTTP::Tinyish is a wrapper module to use curl, wget, LWP and HTTP::Tiny transparently with the same API. You might wonder why you would need the wrapper when you can fatpack and fall back to HTTP::Tiny anyway. This is to support TLS HTTPS requests with a stock perl which doesn’t ship with its HTTP clients that has TLS capabilities. This will be more important in the coming years as more websites will enforce TLS, although I believe PAUSE/CPAN websites will allow non-TLS requests for a while.
The similar code has been there in cpanm for a long time, and this is the first extract of this kind of utility modules.
Now, I moved onto work on outstanding pull requests and bug fixes to cpanm. At this time I was maintaining two different code base: cpanminus-1.7 (devel) branch, and Menlo 2.0 (menlo) branch.
They have very similar codes because one is a copy of another, and provides the same functionalities. Because they’re in different branches under the same repository, we need to apply the same changes to two different branches, or to merge from one to another, with a lot of conflicts to resolve for every merge.
This is obviously painful, and I decided to split the repository into two repos: miyagawa/cpanminus and miyagawa/Menlo. At the same time, I removed App::cpanminus package, and started to use Menlo::CLI::Compat from cpanm so that I don’t need to maintain two different packages for future bug fixes. (Spoiler alert: I thought this was a good idea, but turned out not to be true, more on that later)
I also updated cpanm’s fatpacking tool to use Carton to get the dependencies we want. Previously it was using App::FatPacker’s trace functionality, which works most of the time but is painful to make it work when your perl has unclean site_perl directory because of the side effects of loading modules from there.
This is so much fun of bootstrapping, that we’re building the next release of cpanm using Carton, which relies on the current release of cpanm, when you think about it.
Day 2: Friday
On Friday I continued most of the release-engineering related work on Day 1.
First thing, the split of repositories for cpanminus and Menlo done on Day 1 now means that I have to commit, merge and release from two different repositories for every update. This is slightly annoying, and introduces a bit of confusion for contributors when opening an issue or pull request on GitHub because it’s unclear which repository it has to be fixed.
I quickly decided to move back Menlo to cpanminus repo, but as a subdirectory. Basically this makes it a monorepo with subdirectories for each distribution. It turns out that this has the best of both worlds, so that commits can be made across multiple dists at the same time, while we can release each distribution from its own directory.
In the afternoon I managed to implement a long-awaited feature in cpanfile: ‘dist’, ‘mirror’ and ‘url’ support. It was once added in Carton in its 1.1 branch, but the complexity of the implementation made me abandon it.
This time, the patch against cpanm for this feature is really clean and simple, and I learned from the past mistakes and decided to not DWIM on the handling of these values. dist will only take CPAN dist names such as MIYAGAWA/Plack-1.000.tar.gz, while you can specify your DarkPAN URL with mirror keyword, as well as using url for just arbitrary full URL.
requires'Path::Class',0.26,dist=>"KWILLIAMS/Path-Class-0.26.tar.gz";# omit version specifier requires'Hash::MultiValue',dist=>"MIYAGAWA/Hash-MultiValue-0.15.tar.gz";# use dist + mirror requires'Cookie::Baker',dist=>"KAZEBURO/Cookie-Baker-0.08.tar.gz",mirror=>"http://cpan.cpantesters.org/";# use the full URL requires'Try::Tiny',0.28,url=>"http://backpan.perl.org/authors/id/E/ET/ETHER/Try-Tiny-0.28.tar.gz";
In principle I hesitate to add this kind of new features to cpanm itself, but the argument here is that a) the patch is relatively straightforward and optional and b) users are already abusing this by specifying the URL in requires argument:
requires “http://host/path/Foo-Bar-1.00.tar.gz”;which, I hate to admit, accidentally works, so the feature is not really new, but is a cleaner upgrade. Also, implementing it in cpanm (or Menlo in this case) means the downstream clients such as Carton, Carmel and App::cpm will all get this feature for free, with their ability to override it if needed.
PAUSE hackers
Day 3: Saturday
On Saturday I took a bit of break and went on a hike to the lake, which is pretty easy to do in Oslo with just a 30 minute metro ride.
In the evening I came back to the hackathon and added a support for x_use_unsafe_inc support in META.json after discussing it with ETHER, HAARG and LEONT.
cpanm by default adds PERL_USE_UNSAFE_INC=1when configuring, building and testing modules so that it can install distributions that have not been updated since perl 5.26 removed “.” (current directory) from the library include path.
Some authors want to disable this, who doesn’t want perl to load modules from an arbitrary directory after chdiring to them, to make sure their tests can reveal bugs if the module is relying on that behavior. Now, you can do that by declaring:
"x_use_unsafe_inc": "0"
This is of course opt-in and configured per distribution, and cpanm will continue to set PERL_USE_UNSAFE_INC=1 unless otherwise set in user’s shell for different values.
Day 4: Sunday
Sunday is the last day and I should wrap up, but basically continued working on the remaining stuff, and finally fixed Win32 cmd quoting issue that has been in cpanm from day 1.
Essentially on Win32 you can’t rely on system() and pass arguments in a list, and you have to use modules like Win32::ShellQuote to quote them by hand. cpanm was using its own which function to get the command path name, and added quotes in this command output. This is wrong, and could cause a double escaping issue if you pass an already quoted command to Win32::ShellQuote.
SKAJI has setup an AppVeyor CI repository for me to test the new Menlo-based cpanm on Windows, and I was able to refactor the way we execute the shell command so that it works correctly both on UNIX and Win32, even when the command path or file names include spaces.
I also discussed some quick updates about CPAN static installer with LEONT and ETHER. The basic version of the implementation, which is essentially a port of Module::Build::Tiny, is now in cpanm. This is also an opt-in from CPAN authors and by default cpanm will continue to configure, build and test modules using the standard tools, unless it’s explicitly stated in META.json with x_static_install: “1”
(Right now there’s no way to turn this feature off, but in case it blows up in some buggy distributions, we might need an option to turn this off globally)
RJBS and xdg
After the Summit
After the summit, at the hotel and the airport lounge, I continued investigating the effects of merging cpanm and Menlo. The big striking fact for me was that App::cpm uses and depends on a lot of Menlo::CLI::Compat internals. This essentially makes it difficult or nearly impossible for me to make changes or refactor the internals of Menlo, without breaking downstream clients every time.
Even though SKAJI agreed to patch his code whenever Menlo::CLI::Compat is updated, we decided this is not a great idea for both the maintainer (me) and downstream consumers.
I also know that there are gross hacks out there in the wild, who messes with cpanm internals, or parses its log files or stdout/stderr outputs because frankly there has been no other ways to extend cpanm. I would love to refactor them and make them better, but then if it breaks these users it might not be worth the hassle.
As of this writing, I created a third distribution, Menlo-Legacy, that contains Menlo::CLI::Compat that’s compatible to cpanm 1.7. This is something that is fatpacked into cpanm itself, and can be used by tools like Carton, Carmel or cpm. Menlo will add more features, as well as a lot of refactoring and cleanups, but then the downstream clients can continue using this legacy module, and only need to upgrade to the newer version, whenever they’re ready.
Wrap Up
Working on toolchain is a hard job, since you have to support all the old versions of the software, and will be blamed and criticized for “fixing broken features” because people are relying on these broken features.
This is why Perl Toolchain Summit is so valuable so that I can get together with these people, exchange ideas and get a great moral support.
]]>Tatsuhiko MiyagawaGoogle Pixel Experience2017-05-15T00:00:00+00:002017-05-15T00:00:00+00:00https://miyagawa.co/blog/google-pixel-experienceIf you follow me on Twitter, you have been seeing a lot of my anger tweets against Google on how incapable they are on fixing my broken Pixel phone. If it were with a manufacturer with a better customer support, i.e. Apple, it would have been a walk to the nearest Apple Store and get a replacement phone immediately.
Here’s what’s been happening so far:
2016/10/04 Ordered a Google Pixel
2016/10/21 Received the device
2017/02/20? Installed Android N public beta program
2017/05/02 Contacted Google from the Pixel web support form. I was told that Google support would contact me in 48 hours.
2017/05/04 They did not contact me in 48 hours. I opened another support contact, this time via Pixel’s on-screen help menu. Got an immediate support and a link to order a replacement.
2017/05/05 The replacement phone is shipped with FedEx 2-day.
2017/05/08 I was working from home waiting for the delivery, but FedEx posted a “Delivery Exception”. Given that I needed to go on a trip on the next day, I called FedEx so that they can hold the phone at the shipping center so I can pick up. It was denied because the shipper (Google) doesn’t allow holding the item at the shipping center. Contacted Google to allow it, but they could not.
2017/05/09 Because I do not want to leave the phone package while I’m away, I put a note for FedEx to return the item, also to Google to cancel the shipment.
2017/05/11 The item was successfully sent back to the Google warehouse.
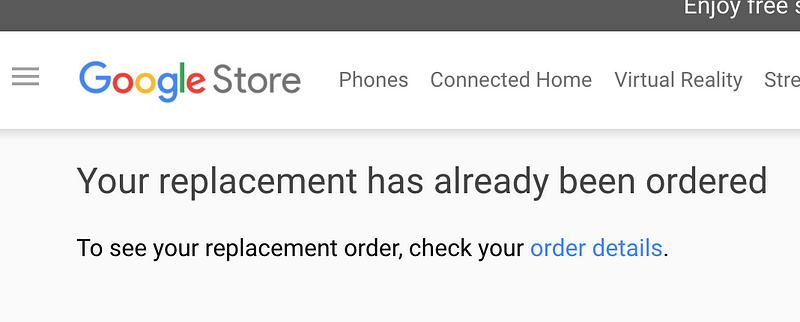
2017/05/13 I sent an email to Google customer support to send me a new link to order a replacement phone, this time to my office so that I can pick up when I’m back.
2017/05/14 Google sent me a new link. The new link does not work, saying “Your replacement has already been ordered.” Contacted Google to fix the issue.
2017/05/15 Google sent me back “Try it with an incognito window.” It does not work either, with the same error.
So I am about 2 weeks since the first contact with Google to get a replacement for this unstable phone, and still haven’t got one, let alone order a new replacement.
Obviously, a phone that freezes randomly is a major inconvenience. I failed to transfer the trains because Google Maps freeze, or failed to take a good picture opportunity because the camera app crashes.
Google Pixel is a great phone and I loved it, but once it gets broken, their customer support experience is a hell.
**Update: **They finally figured out how to cancel the first RMA and have issued a new order link for me, and I received the new replacement phone on May 18. The new phone works great and there’s no freeze so far.
長時間の配信を録音すると必ずどこかでドリフト(音ズレ)が起こる。それぞれのハードウェアクロックが完全に一致せず、また収録中のCPU負荷などによってバッファがずれることによっても起こる。同一世代の Macbook Pro などでも2時間の配信で 1–2 秒はずれることがほとんど。
QuickTime Player で録音する場合、「入力ソース」が正しく USB マイクなどになっていることを確認する。デフォルトで「内蔵マイク」となっていることが多い。
音ズレに関しては、前項目の Skype 録音をバックアップとしてとっておき、それをマスターとして音合わせをするという手段が有効。ただ、頭を合わせても、だんだんずれていく、ということは必ず起こるので、無音部分で調整することが必要になる。
編集: ダブルエンダー方式で録音したソースをDAWソフト (GarageBand, Logic Pro X など) に取り込み、音声加工や編集を行い、聴きやすいものにする。
上記の2つの間でバランスをとっていくことになるだろう。録って出しするにしても、収録時のネットワークトラブルなどによる無音部分などはカットするのが基本だ。
Rebuild では、サポータープログラム向けの RAW データ配信は上記の録って出しが近い。ストリーミング時に録音したローカル録音と Skype 録音をレベル調整しただけのデータをMP3にエンコードして配信している。
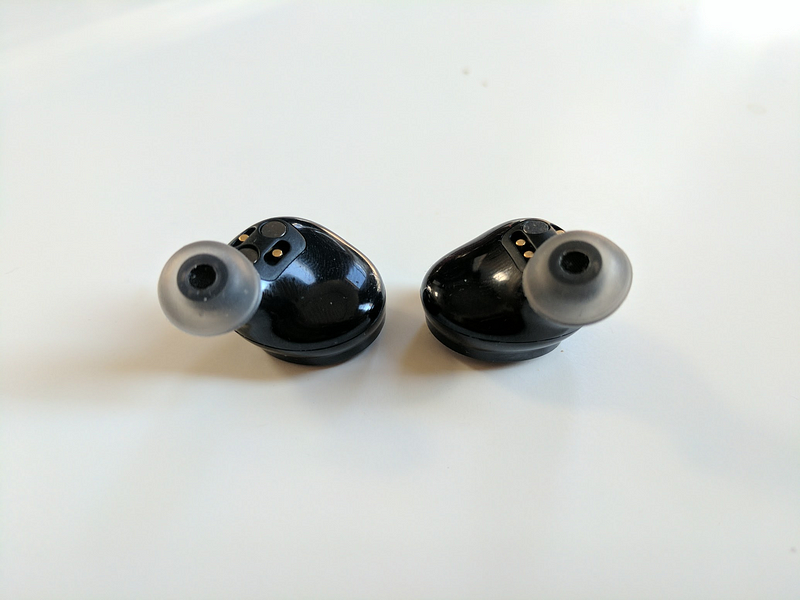
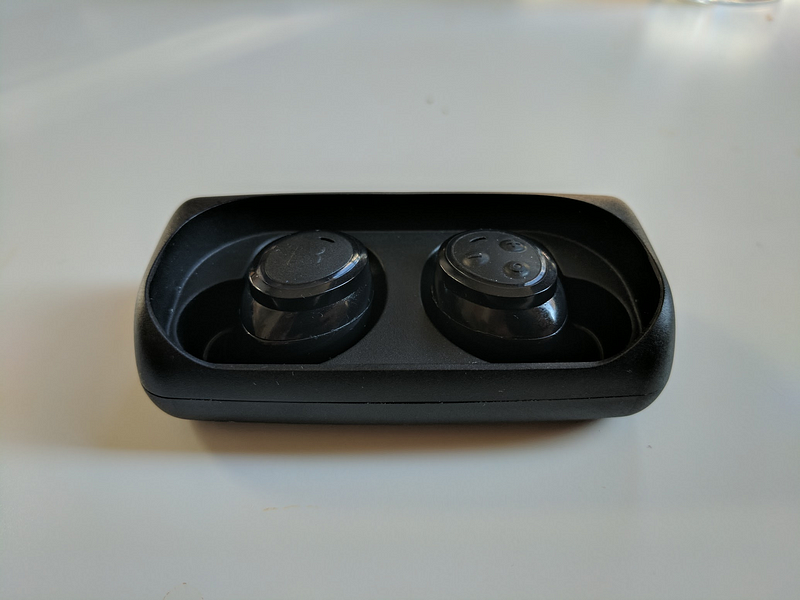
]]>Tatsuhiko MiyagawaBragi The Headphone2017-01-17T00:00:00+00:002017-01-17T00:00:00+00:00https://miyagawa.co/blog/bragi-the-headphoneI ordered The Headphone from Bragi in November, and I finally received it last week. Here’s a review of the wireless earbuds after one week of using it.
Touch sensor
but it has a longer battery life, said 6 hours, and in half of the price ($150).
The Fit
It is very important to have a comfortable and solid fit to the ear, so that I would not drop and lose the earbuds. The Headphone comes with 2 sizes of ear tips (S/M) and slightly bigger foam. I tested both the foam and M-size ear tips, and they both fit to ears comfortably.
The foam piece would be better if your ear is bigger and/or you prefer a tight fit and strong bass from the music. For me, M-size ear tips worked great even with longer hours of wearing.
The Headphone with M-size ear tips
Pairing
Turning on and off the headphone could be a little easier. Turning on requires long-pressing the button on the right side for 1 second. It would be nice if it automatically turns on when I take it out from the charger, like Apple AirPods do.
Turning off is done either by long-pressing the same button for 3 seconds, or putting the earbuds to the case *and *connecting to the charging cable. The latter is a much easier action when I get home, but it is still annoying that putting back the earbud to the case alone is not enough to turn off the device.
Apparently it can automatically go into a sleep mode when no audio has been playing for 10 minutes, but that did not work for me when paired with my Google Pixel phone.
I’ve used Anker IE-20 for about a year and the nice thing about it is that it automatically powers on/off with the magnet. It means that it powers on when I wear it, and powers off when I do not.
Once it’s paired, the connection is solid. I’ve used many Bluetooth headsets like Anker’s IE-20 and Sony’s SBH-20 before, and have always experienced some audio drops in busy areas — I’ve never experienced any drops with The Headphone yet.
The sound is decent, and once you get a tight fit of the ear tips (see above for the fitting), you get a good bass sound as well.
When you listen to audio source with a bit of silence in-between, like podcasts, you might constantly hear a slight static noise getting in and out, on the left side of the earbud. The noise is very subtle, and is hard to notice when you’re in a loud environment, or when you listen to regular music without much silence, though.
Controls
One of the complaints I hear most from Apple’s AirPods users is that it does not have audio controls for volumes and playbacks.
The Headphone has three buttons on the right side, and it provides these features, to control the volume, pause and skip the songs. While it is really nice to have them on the device, it is very uncomfortable to click these buttons while you wear it. You either have to pinpoint the button and click it with a nail, or just push hard the earbud to register the clicks.
I imagine that the touch sensor on The Dash would have been much easier to use.
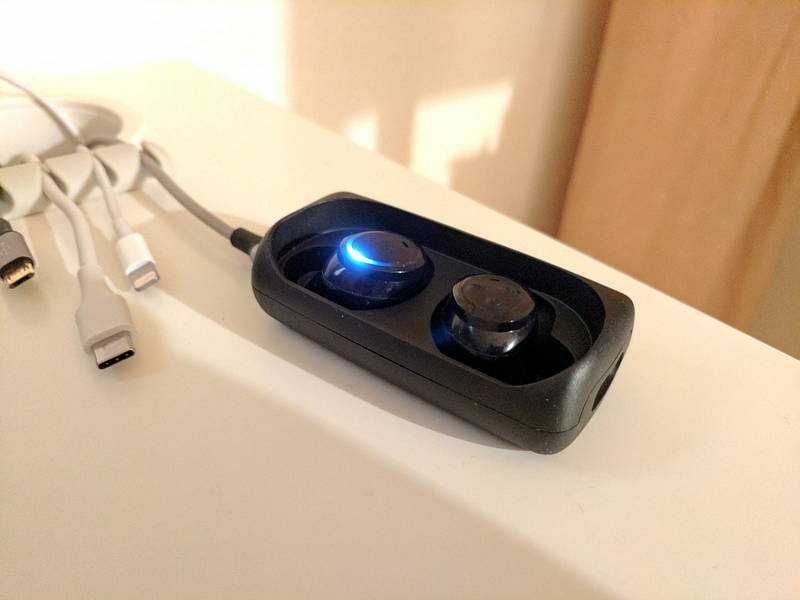
Charging
The Headphone comes with a carrying case, and it has a micro USB connector to charge. The case does not have a battery to provide its power when it is disconnected to the charger, which is a bit of a bummer.
Honestly, the case is a bit too bulky just for a carrying case. For the last couple of days, I just leave the case plugged all the time on my desk, and carry the earbuds in a much smaller pouch in my pocket. This way I can just remove the earbuds and drop them on the charger when I’m home. Obviously, the downside of this setup is I cannot charge the earbuds when it runs out of the juice, after 6 hours of use.
Summary
Overall I like it and would use this most of the time in my commute to the office and in the office when I want to shut the ambient sound. I keep my Anker IE-20 to pair it with my laptop, since multipoint pairing on Bluetooth is still a nightmare in 2017.
Great comfortable fit 👍
Good Bluetooth connection 👍
Solid audio with subtle static noise in silence 👍
Control clicks are annoying 😞
Turning on/off could be more automatic 😞
Bulky carrying case without charger 😞
]]>Tatsuhiko MiyagawaMac: Routing Links to Chrome Profiles2017-01-03T00:00:00+00:002017-01-03T00:00:00+00:00https://miyagawa.co/blog/mac--routing-links-to-chrome-profileswith Choosy and Google Chrome Canary
Assume you’re a Chrome user and have multiple Google profiles, one for your personal account and another for work account. This way you can sign in to sites like Google Apps, GitHub or Slack with the correct account.
The Problem
On Mac OS, Chrome profiles work under one Chrome app instance, which means when you click a link from other apps such as Mail, Twitter clients or Slack app, it will open in the last browser window you opened. This gets you into a situation where you click an internal Wiki link from Slack which opens in your personal profile window, which gets you redirected to your company’s SSO page (such as Okta) because you’re not signed in. Ugh! Now you go back to the other window to make sure it is forefront, then re-open the link. This is obviously tedious.
Solution
Enter Choosy: a browser shim that sends links to the right browser of your choice.
Choosy is designed for users who would like to open a particular link in a browser that’s different from the primary (default) browser.
Here’s the tricky bit: in my use case, there’s no non-default browsers involved. It’s both Google Chrome, just under a different profile, and the way Chrome User Profiles works is not really designed to operate under multiple Chrome instances.
Unlike Chrome beta or dev channel, Chrome Canary operates as a complete separate app instance. This allows you to sign in to your personal account with primary Chrome, then to the work account with Chrome Canary, and they’re recognized as completely different browser applications by the system.
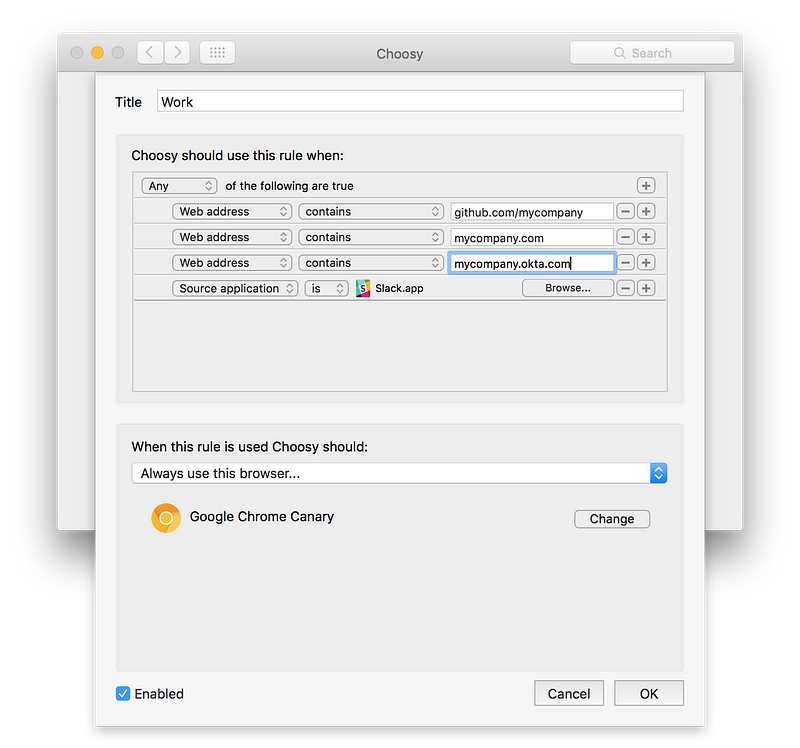
Now, all you need to do is to configure Choosy:
Rules to override Work link addressesYou can list as many enterprise/SaaS domains such as Okta, Zendesk, GitHub Enterprise and so on as an individual rule, and use “Any” to combine the rules.
As of this writing, the “Source application” setting seems to be kind of unreliable according to the developer. It is alright for me, since I use Slack for multiple teams and I do not want all links opened from Slack to go to my Work profile.
You can also add a modifier key such as Shift to force-enable or disable the particular override rules. I set it so that shift-clicking links in Slack always results to open in a work profile.
**Tip: **It is recommended to use one of Chrome themes to easily identify which browser profile you’re using. I chose the one that is similar to our corporate color scheme 😁
]]>Tatsuhiko MiyagawaThings I Bought In 20162016-12-31T00:00:00+00:002016-12-31T00:00:00+00:00https://miyagawa.co/blog/things-i-bought-in-2016なんか流行ってるみたいなので。