Podcasting Setup 2020
It’s been a while since the last time I wrote about my podcasting setup (link in Japanese). Although I haven’t changed most of the setup since the stability is one of the most important things, I’d like to note the current setup since it might be interesting to a future podcaster.
Recording Environment
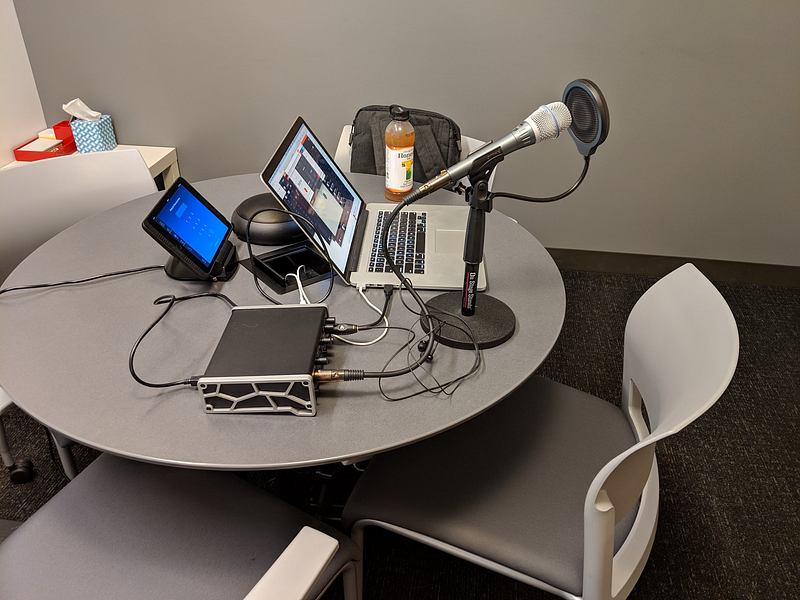
Before getting to the gears, it is important to pick where to record. The most ideal environment is a room with a lot of clothes (like a walk-in closet), or sound isolation pads that prevents echos. Avoid a room with concrete floor or walls, since that will create a lot of reflections and reverbs.
The room should be reasonably close to your wireless router or have a wired ethernet connection, if you intend to have a call with your guest over the internet.
I’ve been recording at my employer’s office since it’s easy to do so during the weekends, and some of the meeting rooms have a really nice audio treatment. As of this writing however, the office is in its closure due to COVID-19 and I record from my bedroom.
Hardware
As for microphones I’ve been bouncing between multiple microphones, but always get back to Shure’s BETA series. Beta 87A (super cardioid condenser, $250) gives a pretty bright pickup pattern and I love the tonality of it, but due to it being a condenser microphone it still picks up some ambient noise and especially my mouth noise, although it’s not as bad as other condenser microphones. Beta 57A (super cardioid dynamic, $140) is a dynamic microphone and doesn’t have this problem at all. It is really a versatile microphone and has been helpful since I record from my bedroom with unexpected ambient noise from the neighbor rooms. Beta 57A’s pickup pattern sounds a bit mushy and has a harsh sibilance for my voice, but it’s not hard to fix in post with some EQ.
For the USB Audio Interface, I switched from Tascam’s US2x2 to MOTU M4 ($220), and I absolutely love it. The audio is really clean and has a lot of gain, and it comes with a hardware power switch, LCD meter, USB-C input, playback/monitor level knob, and an additional loopback channel, which is great for when streaming live.
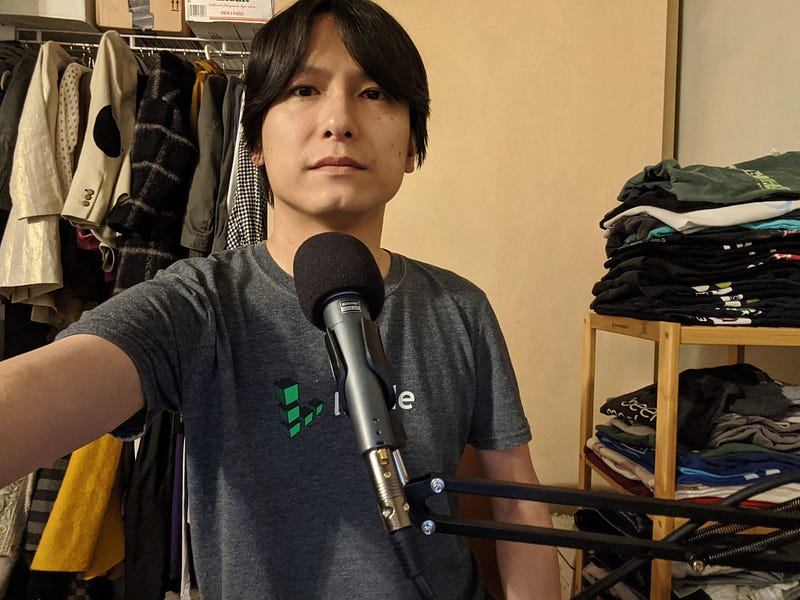
A microphone stand (DS 7200B, $16) and/or boom arm (InnoGear, $12) is important to keep the microphone close to your mouth, 5–8 inches away. Try not to be *too *close to the microphone since that will get your voice sound too bass-y due to the proximity effect. I haven’t used any boom arm before, but as of this writing, this boom arm is very helpful to keep the mic close to my mouth when I need to record from my bedroom.
It is critical to use an in-ear monitor (MEE M6, $50), closed headphones, or earbuds since using open headphones will leak the audio and bleed it to your recordings. Make sure your guest uses an in-ear headphone with tight-fit ear tips as well.
Cheaper Alternatives
Here’s a few alternatives that are more affordable. I usually recommend them, and send them to my guests when they don’t have any microphones. Most of them need a pop filter or a windscreen.
Audio Technica ATR2100x USB ($100) — This is a USB/XLR dynamic microphone with an upgraded USB-C output. Handy for traveling, and you can even record both to computers via USB and a portable recorder via XLR.
Samson Q2U ($85)— Almost the same as ATR2100, but with an old micro USB output.
Rode NT-USB Mini ($100)— A USB condenser microphone. It is very small, yet heavy and sounds great especially when you speak closer enough to the microphone. It’s a condenser microphone and tends to pickup some ambient noise from the room though. I use this mic when making Zoom calls for my work.
Rode PodMic ($100) — I haven’t tried myself, but have seen some great reviews. This is an XLR microphone and you need a USB audio interface to connect to the computer.
Microphone Technique
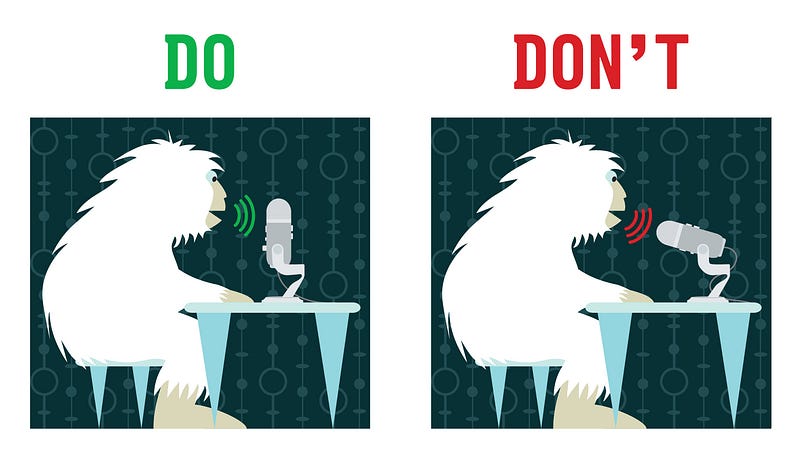
Some microphones are top-addressed and others are side-addressed. Learn which one your microphone is, and speak from the right angle.
via https://twitter.com/bluemicrophones/status/755062370041470976
Mobile Recording
I haven’t done a lot of in-person recordings, but when I do, I use Zoom H5 ($280) paired with a few Beta 57a’s. H5 is a versatile portable audio interface, and can record it to its SD card as well. You can pair it with Behringer UCA202 ($35) to send the monitor output to the computer, since H5 doesn’t let you record the SD card and use it as a USB interface at the same time.
If you do a lot of mobile recordings, I’d consider Rodecaster Pro or Zoom L-8.
Software
Recording & Streaming
I record the show over Discord calls. Most of the time Discord has the cleanest audio with very little lags, and has reasonable amount of options to tweak when something goes wrong. Sometimes the server is overloaded, or the latency is unbearable and makes it hard to make a conversation, and we fallback to Skype, or FaceTime audio. I configure these VOIP apps to send the output to the audio interface (M4).
On my Mac, my voice (M4 channel 1) and Discord output (M4 loopback channel 5/6) are recorded in Audio Hijack ($59) as WAV files, and are sent to a virtual input channel “Podcast Mix” in Loopback ($99).
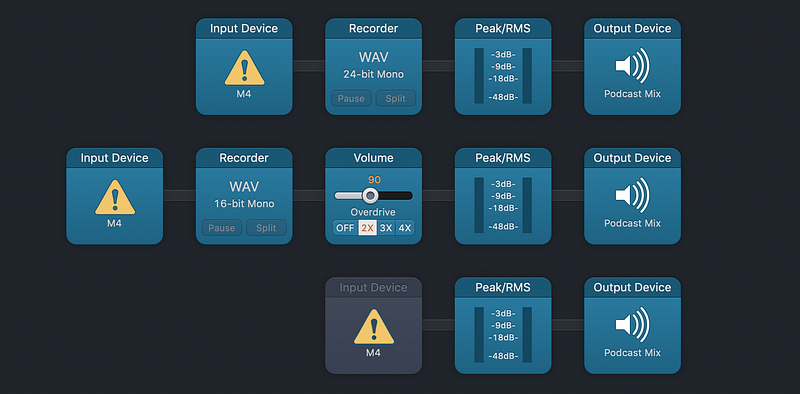
When I need to play some pre-recorded audio (like a sponsor read), I connect my iPad Air to M4 channel 2, and mix it in as well.
The “Podcast Mix” channel is now the input channel for the streaming software Mixlr. This way the voice of the guest and myself will be mixed and streamed over Mixlr, so I can receive realtime feedback while recording the show.
I ask the guests to record their end locally (Double-ender) using QuickTime Player, and send it to me after the show, so I can have the cleanest mix, without a compression artifact over Discord. I do record the Discord output as a backup on my side as well, in case a guest forgets to hit the record button, or records their voice using a wrong microphone (e.g. laptop built-in).
Post-Production
First, I run the individual source audio files through Auphonic ($89, or freemium with its cloud service) with a minimal noise reduction, and set to -26 LUFS.
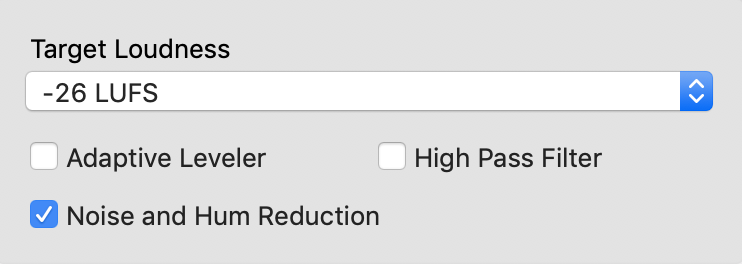
I have some thoughts about this and have tried multiple configurations, but running Auphonic first ensures that basic noise and hum are removed, and that all files have the same loudness level. The output files will be imported to Logic Pro X ($199).
I run each channel through multiple plugins, and it’s not always the same, since badly recorded audio needs more plugins to fix it. Here’s a basic list of plugins I apply:
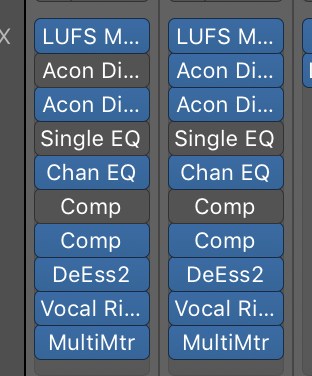
- Acon Digital DeNoise ($99) — Usually unused. Only applied when Auphonic is unable to remove some noise such as air conditioning, or laptop fan noises.
- Acon Digital DeVerberate ($99) — Only applied when the guest records in a room with a lot of echo.
- Acon Digital DeClick ($99) — Applied to reduce mouth clicks.
- Channel EQ — Cut low frequency and bump high frequency slightly to add some presence.
- Compressor — Very mild compressor to reduce the dynamic range.
- DeEss2 — Removes sibilance of the “S” sound.
- Vocal Rider ($89) — Applied to bring up the audio level for when the speaker is quiet and brings down when they’re loud, basically to level the overall loudness over time. You can achieve the similar by applying a strong compressor, but that’d usually sound too hot and unnatural.
- Adaptive Limiter — Applied to the master track to suppress all the peaks. After bouncing the audio, I run the output through Auphonic again, with -19 LUFS loudness, without any audio filters. This is to ensure the audio level is the same across all of my episodes. I wish I don’t have to do this since in theory I should be able to do this in Logic Pro X alone — but I have hard time exporting the audio with the correct loudness level without some harsh limiter artifacts. (It’s very likely i’m not using the limiter correctly)
I encode the audio to MP3 using Forecast (free). This is just a frontend for the LAME (free) MP3 encoder. I use a custom Python script to tag chapter information to the mp3 file, reading the list from a YAML file.
During the whole post-production I use the in-ear monitor earbuds to listen to the audio. Once the audio is exported to MP3, I use the AirPods Pro to ensure the levels are roughly the same among the speakers, since different headphones have different frequency response to low-pitch vs high-pitch voices.
Cheaper Alternatives
I spend a good amount of money for the post production software for editing and encoding. This is because using these tools saves a ton of my time, by throwing some money at it. None of these is strictly necessary, and you can definitely start your show with basic software like Audacity, GarageBand or Ferrite on iPad.
Summary
This whole list might sound overwhelming and makes it scary to start a podcast, but this is the setup I’ve arrived after doing the podcast for 7 years. You absolutely don’t need all of this when to start a show, and can start with a minimum and make it grow over time whenever you feel like you need it.
Hope this is helpful to someone. Feel free to ask questions or feedback to me on Twitter.